Build a Brand Guide So Every AI Output Stays On-Brand
One setup per client keeps every content run on brand. A 3-step chain reverse-engineers the brand into a single note that every downstream content playbook (ads, social, blog, email) reads automatically. The offering section adapts to whatever the client sells, so it fits products, services, software, or storefronts.
What this does
If you run AI content for more than one client, you’ve hit this wall: every task briefs the brand from scratch. The copy sounds slightly off. The image’s blue isn’t quite the client’s blue. A headline uses language the client wouldn’t. Across ten clients and dozens of content runs per client per month, that drift shows up in the work.
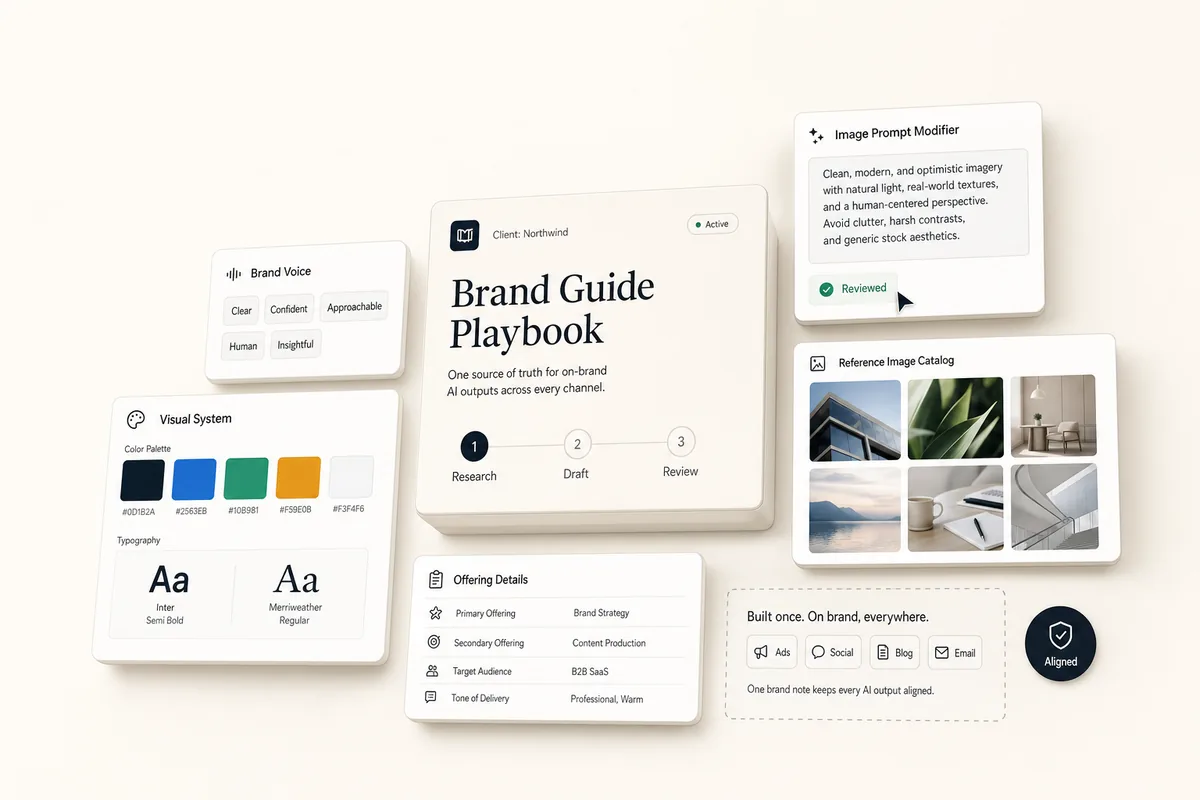
This playbook fixes that with one per-client setup. It reverse-engineers the client’s brand into a single note covering voice, visual system, photography direction, offering details, and ad creative style. Two halves of the same note: the Brand Overview (five voice adjectives, positioning) keeps AI-generated copy (ads, social posts, emails, blog articles) sounding like the client. The Image Generation Prompt Modifier, a 50 to 75 word paragraph, prepends to every image and keeps visuals consistent. A catalog of real reference images harvested from the client’s own website gives image-generating playbooks real brand URLs to pass to Gemini as style anchors. The offering-details section adapts to whatever the client sells, so this works whether they’re a physical product, a service, software, or a physical location.
Run it once per client during onboarding. Every content run after that reads this note automatically. You stop re-briefing brand on every task.
Best for
Any client you generate content for, regardless of what they sell. Usually kicked off automatically by the new-client onboarding playbook, but you can also run it standalone at any point (onboarding an existing client, refreshing after a rebrand, etc.). Content-generating playbooks read this note on every run: image playbooks for visual consistency, copy playbooks for voice.
How the chain works
Template 1: Research Brand. Budget-bounded data collection. 3 page browses on the client’s site (homepage, About, one product or services page) with detail: full to pick up the image list in one call, and one call each to Meta Ads and Google Ads for top-spending ads if those integrations are connected. Evaluates images and picks the 8-12 best candidates, dropping logos, icons, and decorative junk. Descriptions are inferred from URL, alt text, and page context (the AI cannot see the actual pixels), with a “subject unclear” fallback when signal is low. Writes everything into one “Brand Research Findings” deliverable. When done, books Template 2.
Template 2: Draft Brand Guide. Reads the findings deliverable and the client profile (for hex values and fonts). Checks for an existing Brand Guide note and updates it in place, or creates a new one. This is the synthesis step, and its job is to make the Image Generation Prompt Modifier paragraph as precise as possible. That single paragraph is prepended to every AI image generated for the client, so its 50-75 words shape visuals more than any other field in the note. Creates or updates a client note titled exactly “Brand Guide”. When done, books Template 3.
Template 3: Review Brand Guide. You review the note, tweak the Prompt Modifier paragraph, prune any reference images the AI kept that don’t belong, fix any wrong descriptions, and approve. The approved note is live for every image playbook from that point on.
Requirements
- Templates 1 and 2 need Autocomplete and Run on complete enabled.
-
The client’s website URL must be available before Template 1 runs: paste it into the
[CLIENT WEBSITE URL HERE]line in the Lifty Prompt before scheduling, or set thewebsitefield on the client profile. Pasting it into the prompt directly is more reliable. - The client note must stay titled exactly Brand Guide. Downstream playbooks match on that title; renaming it breaks the chain.
- If the client profile already has brand colors and fonts extracted (automatic when the website is set), Template 2 uses them as the starting point for the Visual System section.
- Optional but useful: Meta Ads and Google Ads integrations. Template 1 pulls the client’s top-spending ads for the Ad Creative Style section if either is connected, and skips silently if not.
How to use it
-
Create a task from “Research Brand (1/3)” for your client. Before saving, paste the client’s homepage URL into the
[CLIENT WEBSITE URL HERE]line in the Lifty Prompt (or leave it blank to fall back to the website on the client profile; pasting it is more reliable). - On its due date, it autocompletes: gathers site research and ad history into a “Brand Research Findings” deliverable, then books the Draft task for 5 minutes later. To run it earlier, mark it complete yourself, set the due date sooner, or open the task and click Run Prompt.
- The Draft task autocompletes off the findings deliverable and writes the Brand Guide client note.
- The review task lands in your queue. Open the “Brand Guide” client note on the client’s Activity screen, tighten the Prompt Modifier paragraph, prune any reference images that don’t belong, and mark complete.
- The note is now live. When you run the Ad Creatives playbook or the Blog to Social playbook, the AI reads this note automatically and uses the Prompt Modifier and reference images on every generation.
Tips
- Treat this like an onboarding asset. One Brand Guide per client, set up once at the start of the relationship. Every content playbook you run for that client from then on reads this note automatically. Across your full roster, that’s dozens of content runs per client per month that no longer need manual brand briefing. Refresh only when the client rebrands.
- The Prompt Modifier is the whole game. The AI’s draft is a starting point. Every image the client ever generates starts with this paragraph, so rewriting it in your own voice during review is the single biggest quality lever. Budget 5-10 minutes of real attention here.
- Add reference images the AI missed. If the client has a photo library, a Dropbox, or product shots they use in email campaigns, paste those URLs into the Reference Images section by hand. The AI is limited to what it finds on the public website.
-
Adapt the Offering Details section to the client. The AI fills this section based on what the business actually sells, but it’s worth adding specifics during review. Depending on the client, that might include any of:
- Physical products: packaging materials, finishes (matte, gloss, translucent, embossed), label placement, product colorways.
- Services: uniforms, vehicle or fleet styling, signage, before/after signatures, the feel of a typical work site.
- Software: app icon, dashboard conventions, key UI patterns, color of the product UI vs the marketing site.
- Physical locations: storefront look, interior photography style, signage, typical props and surfaces on-site.
- Ground the Ad Creative Style section in real spend. If the client has Meta Ads or Google Ads connected, the AI pulls their top-spending ads over the last 90 days to anchor this section in what has actually worked, not guesses.
- Re-run after a rebrand. If colors, fonts, or creative direction change, run this playbook again. It updates the existing note rather than creating a duplicate.
- Kicked off by the New Client Onboarding playbook. That playbook creates a task from this one automatically during onboarding, so the Brand Guide is built before the kickoff call.
-
Pairs with these downstream playbooks:
- Ad Creatives (hard dependency): reads the Brand Guide for the Prompt Modifier, Image Dos and Don’ts, and Reference Images on every run.
- Blog to Social (hard dependency on the image step, same as above; copy steps are unaffected).
- SEO Blog Post pipeline (soft dependency): reads the Brand Overview section for voice. Writes the article either way.
Credits
The Brand DNA approach this playbook is built around, and the Image Generation Prompt Modifier concept specifically, come from a public prompt walkthrough shared by Will Sartorius and the Adcrate team: Nano Banana 2 Prompt Document and their YouTube walkthrough. We have adapted it to fit our tools and workflow.
The templates
Paste these into Settings → Task Templates in your Lifted Work account. Create a template group, add each template in order. When you create tasks from these templates, the AI picks up client context automatically.
[1/3] Research Brand
Be specific and grounded in what’s on the site. Don’t invent.
Inputs
Client website (falls back to the website field on the client profile): [CLIENT WEBSITE URL HERE]
Limits
3 site browses, 8-12 image catalog entries.
Step 1: Load existing brand data
Read the client profile for website URL, brand config (colors, fonts, logo), and overview.
Step 2: Browse the client’s site
Browse three pages with full detail: homepage, About page (skip if missing), and the most prominent product/services page.
While browsing, pick 8-12 images for the catalog: real people, products, lifestyle scenes, brand-styled compositions. Skip logos, icons, decorative elements, thumbnails under 400px, and stock.
You can’t see pixels; describe images using URL, alt text, and page context:
- Strong (descriptive URL/alt): “Head roaster Mark (per alt text); homepage hero slot.”
- Mid (generic URL, clear context): “About page under ‘Our Story’, likely a team photo.”
- Weak (generic URL, no context): “Homepage image, subject unclear; reviewer to confirm.”
Step 3: Write findings
Create one deliverable titled “Brand Research Findings” with these H2 sections (drop any with no content):
- Voice Signals: five adjectives from site copy, 2-3 quoted sentences, which pages.
- Photography Direction: one phrase each on lighting, color grading, composition, subject matter, props/surfaces.
- Visual System Observations: primary vs accent usage, background colors, CTA style, typography treatments.
- Offering Details: what they sell, how it shows up visually (adapt to business model), brand marks, distinctive features.
- Ad Creative Style Hints: formats, text overlay style, photo vs illustration, UGC. Include top ads if integrations connected.
- Image Catalog Candidates: entries grouped by source page under H3 sub-headings. Each entry: image markdown, blank line, one-sentence description.
Create a task from the “[2/3] Draft Brand Guide” template, due 5 minutes from now.
Before saving this task, edit the Lifty Prompt:
-
Paste the client’s homepage URL into the
[CLIENT WEBSITE URL HERE]line. If you skip this, the AI falls back to the website on the client profile. - Save the task. Within about 10 minutes of this task completing, the AI will research the brand, draft a Brand Guide note, and create a review task assigned to you to look over.
[2/3] Draft Brand Guide
Read the client profile for brand config (colors, fonts, logo, overview).
Look up the “Brand Research Findings” deliverable.
Check if a “Brand Guide” client note already exists. Update it if so; create one if not.
Build the note in markdown. H1: “Brand Guide: {Client Name}”, then these H2 sections. Write “Not applicable” for sub-fields that don’t fit; never leave placeholders.
-
Brand Overview: tagline, five voice adjectives, positioning (one sentence).
-
Visual System: fonts, primary/secondary/accent colors as #RRGGBB, background colors, CTA color and style.
-
Photography Direction: lighting, color grading, composition, subject matter, props/surfaces, mood. One phrase each.
-
Offering Details: what they sell, how it shows up visually (adapt to business model), brand marks, distinctive features.
-
Ad Creative Style: formats, text overlay style, photo vs illustration, UGC, top past ads if available.
-
Image Dos and Don’ts: bullets grounded in findings. Don’t invent.
-
Image Generation Prompt Modifier: a single 50-75 word paragraph (NOT a list). Dense and specific: exact hex values, font names, photography direction, mood. Example:
Brand aesthetic: minimalist editorial photography. Soft diffuse daylight, low contrast, warm neutral color grade. Primary accent #2563EB deep blue against off-white #FAFAF7. Playfair Display headlines, Inter body, tight tracking. Generous negative space, subject slightly off-center. Mood: confident, quiet, premium. No stock cliches, no busy compositions.
-
Reference Images: copy from Image Catalog Candidates in the findings. Image markdown, blank line, description. Grouped by source page under H3 sub-headings.
Save the note (update if existing, create if new).
Create a task from the “[3/3] Review Brand Guide” template, due tomorrow.
[3/3] Review Brand Guide
The AI has built a Brand Guide for this client. This note is the source of truth for every image playbook. Review before the team starts generating content.
- Brand Overview. Do the five voice adjectives match how this brand sounds? Is the positioning accurate?
- Visual System. Are the hex colors and font names correct? Fix any guesses.
- Image Generation Prompt Modifier. This is the single most important field. Every image the client generates starts with this paragraph. Read it out loud. Tighten the language, add specifics the AI missed, cut anything generic.
- Reference Images. The AI picked these from URLs and alt text without seeing pixels, so some entries may say “subject unclear.” Click through each: rewrite descriptions to match what you see, or drop off-brand images. Add URLs for assets not on the public site (Dropbox links, email hero images, etc.).
- Approve. Once the modifier is tight and reference images are solid, the Brand Guide is live.
- Mark this task complete.
More workflows
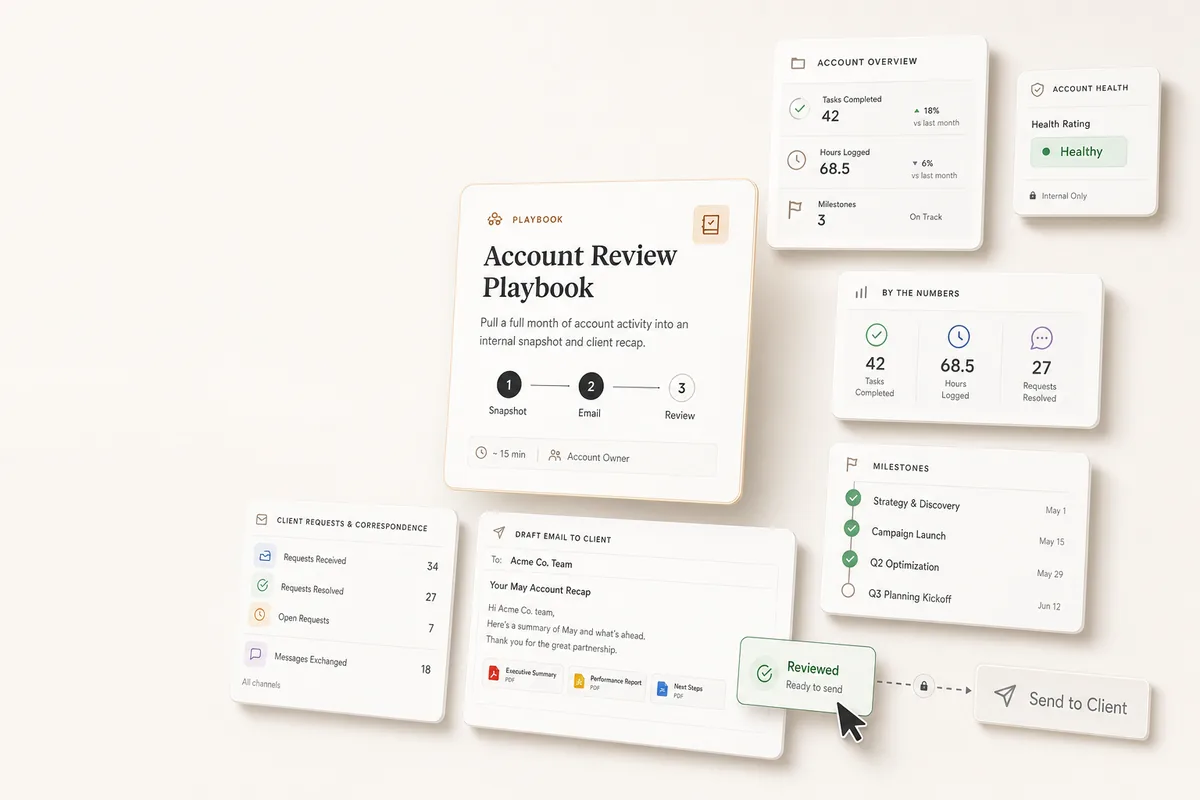
Automate Monthly Account Reviews
Three chained tasks pull account activity for the month, create an internal health snapshot, and draft a recap email to the client with report links.
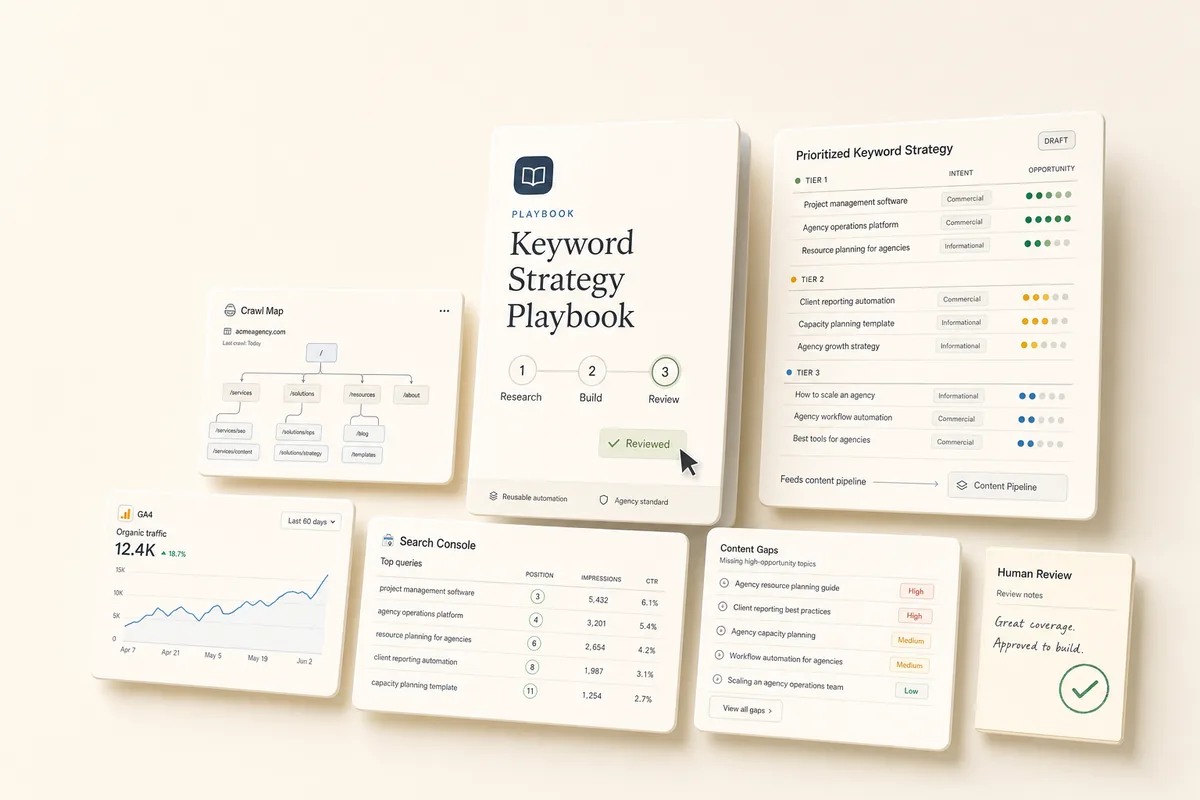
Build an SEO Keyword Strategy That Feeds Your Content Pipeline
Analyzes the client's website plus Search Console and GA4 data, then saves a prioritized keyword strategy as a client note the AI references every time it writes content.
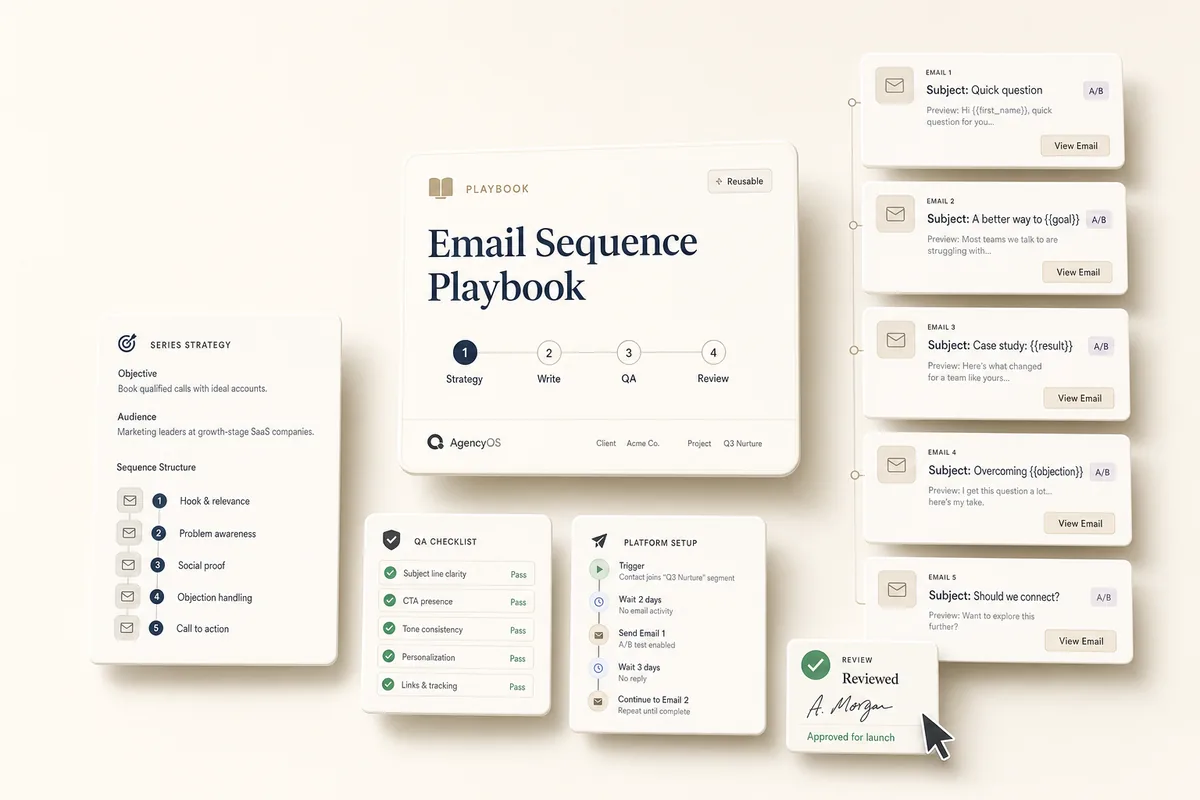
From Strategy to Send-Ready Emails in One Chain
Four chained tasks: strategy, copy with A/B subject lines, QA for subject lines and CTAs, and a review task on your desk with setup instructions for your email platform.
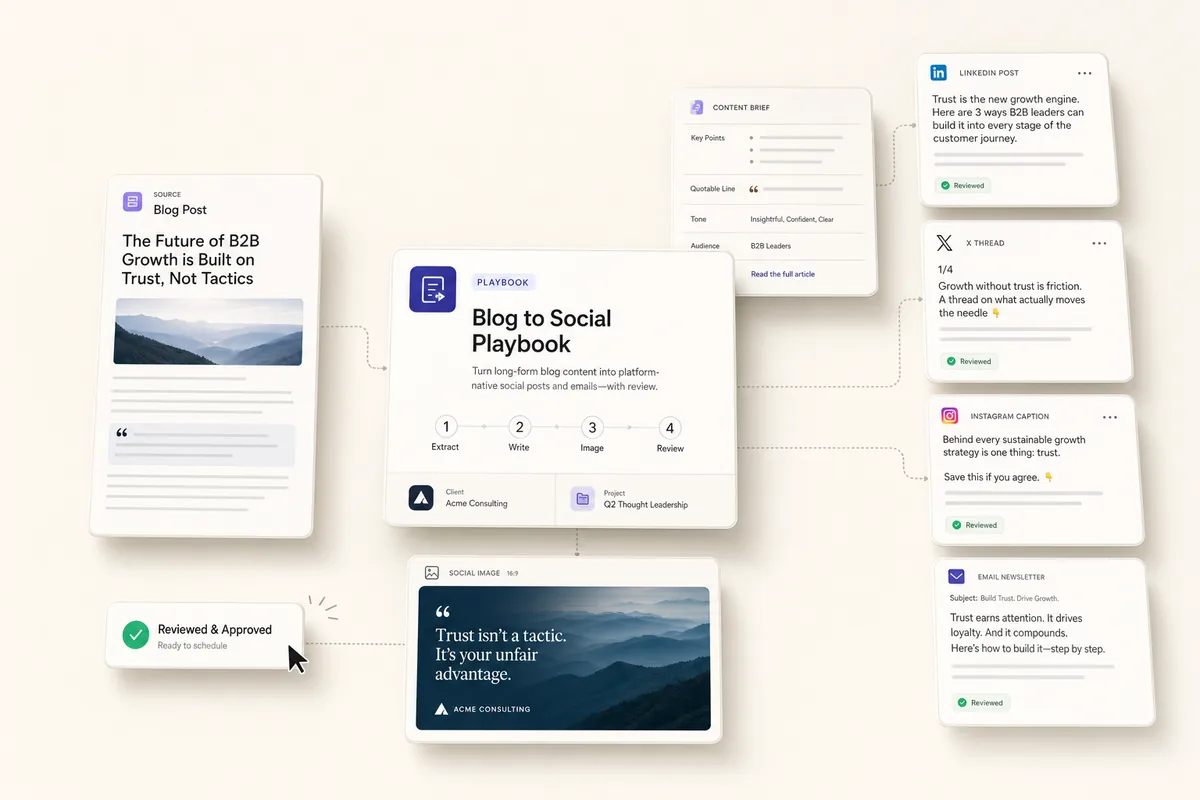
Turn Blog Posts Into Social Content and a Branded Image
Four chained tasks extract the key points, write copy for LinkedIn, Twitter/X, Instagram, and email, generate a branded social image, and land a review task on your desk.